
My configuration is based on the following Cisco Live session BRKDCN-2982. Specifically the “Deploy Cilium Over EVPN / VXLAN Fabric” use case.

On-Demand Session Library – Cisco Live On-Demand – Cisco
Configure Kubernetes Pod
Next I created a namespace and pod deployment so I actually have something to advertise into BGP.
#Create namespace
kubectl create namespace plumbing

#Deploy our new nginx container within our watersource Pod
kubectl create deployment watersource --image=docker.io/nginx:1.15.8

#Replicate our watersource pod so it's horizontally scaled across our workernodes. Note: each replica of the pod will be given a /24 subnet from our wider /16 podcidr of 172.16.0.0
kubectl scale deployment watersource --replicas=2
Now we confirm our Kubernetes deployment.
kubectl get deployment -o wide
kubectl get pod -o wide
We can see in the above output that our pod is split across multiple workernodes each with an IP address from a /24 from within the wider 172.16.0.0/16 PodCIDR.
Cilium eBGP Configuration
Next we can finally configure our eBGP in Cilium. I have created a networkconfiguration directory, here i’ve created a routerbgp.yaml file.

Within the routerbgp.yaml file we have the following configuration.
Key sections here:
- CiliumBGPClusterConfig
- CiliumBGPPeerConfig
- CiliumBGPAdvertisement
Within the CiliumBGPClusterConfig we can see the following:
- nodeSelector : This is important, if you set nodeSelector labels you must label your Workernodes to include them in BGP. This enables us to filter out eBGP peering with our Controlplane (Master Node). You can completely remove the nodeSelector section and all nodes will carry out eBGP peering. The following command sets node labels, leaf: leaf is used in the yaml file.
kubectl label nodes workernode1 workernode2 leaf=leaf
- LocalASN (Kubernetes ASN)
- PeerASN (Nexus Spine and Leaf ASN)
- PeerAddress (Loopback999 IP on Nexus Spine and Leaf)
Within the CiliumBGPPeerConfig we should focus on the following:
- eBGP multihop, this is important as we’re peering with Loopbacks on the Nexus Leaf.
Finally the CiliumBGPAdvertisement:
- PodCIDR is configured for advertisement, this ensures our 172.16.0.0/16 is advertised (Only the active POD addressing will be advertised, in our case 172.16.1.0/24 and 172.16.2.0/24).
- It’s worth noting this is where we can add advertisement of our Service IPs.
apiVersion: "cilium.io/v2"
kind: CiliumBGPClusterConfig
metadata:
  name: leaf
spec:
  nodeSelector:
    matchLabels:
      leaf: leaf
  bgpInstances:
    - name: "instance-65010"
      localASN: 65010
      peers:
        - name: "peer-65010-leaf1"
          peerASN: 65001
          peerAddress: "10.255.255.1"
          peerConfigRef:
            name: "peer-config-generic"
        - name: "peer-65010-leaf2"
          peerASN: 65001
          peerAddress: "10.255.255.2"
          peerConfigRef:
            name: "peer-config-generic"
---
apiVersion: "cilium.io/v2"
kind: CiliumBGPPeerConfig
metadata:
  name: peer-config-generic
spec:
  ebgpMultihop: 5
  families:
    - afi: ipv4
      safi: unicast
      advertisements:
        matchLabels:
          advertise: "pod-cidr"
---
apiVersion: "cilium.io/v2"
kind: CiliumBGPAdvertisement
metadata:
  name: pod-cidr
  labels:
    advertise: pod-cidr
spec:
  advertisements:
    - advertisementType: "PodCIDR"
Once the yaml file is saved we can apply the configuration.
kubectl apply -f networkconfiguration/routerbgp.yaml
We can confirm our BGP peers have been configured with the following command. At this point we haven’t configured our Nexus eBGP configuration so our neighbors will stay in idle.
Its worth noting, if no neighbors appear when you run this command you may have incorrectly labelled your nodes, you should be seeing idle entries.
cilium bgp peersFinally for our lab we must ensure we have our INTER-VM addressing configured and our static routing in place so we can reach the Nexus Loopbacks via their anycast gateway.
In my lab I have configured a temporary solution, a permanent fix would be configuring netplan (I just haven’t got round to it yet).
I have also added a static route to our Spine and Leaf specifically for our inter-pod (172.16.0.0/16) communication due to our use of native routing.
This static route PodCIDR /16 combined with our eBGP advertisements of Pod /24s allows pods on separate worker nodes.
#worknode1
sudo ip addr add 192.168.100.252/24 dev ens37
sudo ip link set dev ens37 up
sudo ip route add 10.255.255.1/32 via 192.168.100.10
sudo ip route add 10.255.255.2/32 via 192.168.100.10
#INTER-POD Native Routing
sudo ip route add 172.16.0.0/16 via 192.168.100.10

#workernode2
sudo ip addr add 192.168.100.253/24 dev ens37
sudo ip link set dev ens37 up
sudo ip route add 10.255.255.1/32 via 192.168.100.10
sudo ip route add 10.255.255.2/32 via 192.168.100.10
#INTER-POD Native Routing
sudo ip route add 172.16.0.0/16 via 192.168.100.10
Nexus BGP Configuration : L3VNI + Local Loopbacks + iBGP
Finally we can bring up our Nexus configuration and ensure our PodCIDR addressing is advertised into our Nexus Spine and Leaf.
Its worth noting the fundamental VXLAN / EVPN configuration is as per my Single-Pod VXLAN / EVPN series of posts and wont be discussed here.
I also won’t be discussing VPC configuration.
As a reminder here is our routing design
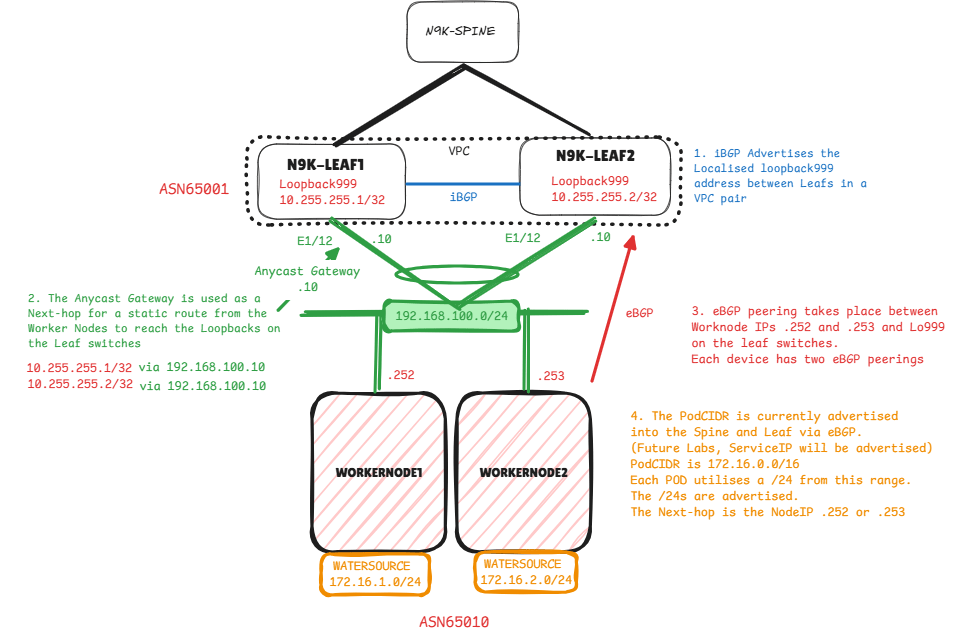
First configure our External VRF (L3VNI). Named External as we expect the addressing we receive from our Kubernetes Cluster over eBGP is to be advertised out of the Spine and Leaf to allow for egress connectivity.
L3VNI
vrf context External
  vni 212121
  rd auto
  address-family ipv4 unicast
    route-target both auto
    route-target both auto evpn
!
interface nve1
 member vni 212121 associate-vrf
!
vlan 2000
 name K8s-External
 vn-segment 212121
!
evpn
vrf context External
  rd auto
  address-family ipv4 unicast
    route-target both auto
    route-target both auto evpn
Now we can configure our localised loopbacks
Loopbacks
#LEAF-1
interface loopback999
  vrf member External
  ip address 10.255.255.1/32

#LEAF-2
interface loopback999
  vrf member External
  ip address 10.255.255.2/32
Next configure iBGP within our external VRF between Leafs and ensure we’re advertising Loopback999. Typically we don’t connect Leaf switches together (VPC exception, unless fabric VPC) however to ensure a straight iBGP connection i’ve added a link purely for this.
I’ve added a permit all route-map for redistributing directly connected, and a prefix-list for the LF999 address 10.255.255.1/32.
Next-hop-self is important as we want to allow Cilium to eBGP peer via our primary VPC over our Peer-link to our secondary VPC and vice versa for failover purposes and multi-pathing.
iBGP
router bgp 65001
  vrf External
    address-family ipv4 unicast
      redistribute direct route-map redist-direct
     neighbor 192.168.200.2
      remote-as 65001
      address-family ipv4 unicast
        prefix-list LF999 out
        next-hop-self
Now we confirm our iBGP peering is established between Leaf-1 and Leaf-2.

Next check our lo999 addressing is in our routing table as iBGP. This addressing shouldn’t be advertised via the L2VPN EVPN address-family.

Nexus BGP Configuration : L2VNI + Anycast Gateway + VPC Interface
Now we can move onto configuring our L2VNI + anycast gateway that will be used as a next-hop for cilium to reach our localised loopbacks.
L2VNI
vlan 300
  name K8s
  vn-segment 160300
!
interface nve1
  member vni 160300
    mcast-group 229.0.100.1
!
evpn
  vni 160300 l2
    rd auto
    route-target import auto
    route-target export auto
Anycast Gateways
#LEAF-1
interface Vlan300
  no shutdown
  vrf member External
  no ip redirects
  ip address 192.168.100.10/24
  fabric forwarding mode anycast-gateway

#LEAF-2
interface Vlan300
  no shutdown
  vrf member External
  no ip redirects
  ip address 192.168.100.10/24
  fabric forwarding mode anycast-gateway
VPC Interface
interface port-channel100
  switchport access vlan 300
  vpc 100
!
interface Ethernet1/12
  switchport access vlan 300
  channel-group 100 mode active
Nexus BGP Configuration : eBGP Configuration
Finally we can configure our eBGP peers from Nexus to Cilium!
- Workernode1 : 192.168.100.252 Node IP within INTER-VM network
Workernode2: 192.168.100.253 Node IP within INTER-VM network- eBGP Multihop: Peering eBGP from a loopback
- Update-source Loopback999: Peering eBGP from a loopback
- As-override: We need external non-Cilium eBGP peers receiving addressing to see the Spine and Leaf AS only. Overrides Cilium ASN 65010 with Nexus ASN 65001
- Disable-peer-as-check: Overrides loop prevention of eBGP, I assume this is due to as-override, Nexus sees 65001 in received advertisements but is allowed to readvertise.
router bgp 65001
vrf External
    address-family ipv4 unicast
      maximum-paths 32
    neighbor 192.168.100.252
      remote-as 65010
      update-source loopback999
      ebgp-multihop 5
      address-family ipv4 unicast
        as-override
        disable-peer-as-check
    neighbor 192.168.100.253
      remote-as 65010
      update-source loopback999
      ebgp-multihop 5
      address-family ipv4 unicast
        as-override
        disable-peer-as-check
So now we can confirm our eBGP neighborships firstly in the Nexus Leafs.

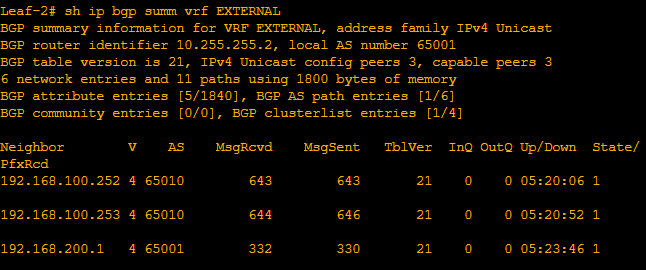
Next we confirm our Cilium BGP Peers are as expected.

Finally we can confirm we’re seeing our PodCIDR in our External VRF.


Some interesting points about the routing before we test connectivity!
- 172.16.1.0/24 is Workernode1 172.16.1.243 : Pod is Watersource
- Next-hop is Workernode1 IP 192.168.100.252
- 172.16.2.0/24 is Workernode2 172.16.2.39: Pod is Watersource
- Next-hop is Workernode2 IP 192.168.100.253

172.16.1.0/24, ubest/mbest: 1/0
    *via 192.168.100.252, [20/0], 05:14:51, bgp-65001, external, tag 65010
172.16.2.0/24, ubest/mbest: 1/0
    *via 192.168.100.253, [20/0], 05:14:51, bgp-65001, external, tag 65010
Ping checks from Leaf-1 to our Pods at 172.16.2.39 and 172.16.1.243 confirm connectivity from our VXLAN / EVPN fabric to our Kubernetes cluster via our Cilium eBGP routes.


So that’s it, our eBGP connectivity and PodCIDR route advertisement is completed.
Native Routing Test
To add, as we’re using native routing, we can test our connectivity between Pods.
As seen on previous pages I have already deployed and replicated my nginx containers across nodes.

Now I can deploy my nettools container and run a ping test between pods on different Workernodes utilising separate /24 ranges within the PodCIDR 172.16.0.0/16.
apiVersion: v1
kind: Pod
metadata:
  name: nettools
  namespace: default
spec:
  containers:
  - name: nettools
    image: jrecord/nettools:latest
    command:
      - sleep
      - "3600"
    imagePullPolicy: IfNotPresent
  restartPolicy: Never
Once I configure the above yaml file I can deploy the pod using the kubectl apply command.
kubectl apply -f podcommands/nettools.yamlWe can now see our nettools pod is ready to use.

From here we can access the nettools container using the following command.
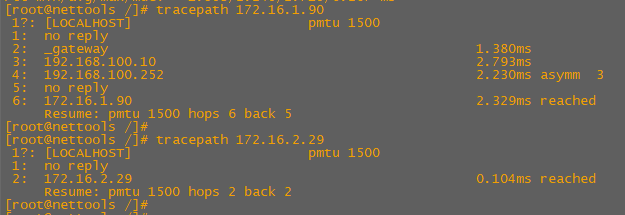
kubectl exec --stdin --tty nettools -- /bin/bashFinally we can see that from our nettools pod on 172.16.2.63 can ping both our watersource pods on 172.16.2.29 and 172.16.1.90.

We can also see the difference in tracepaths between the pods deployed on workernode2 together and the pod deployed separately on workernode1
We can see these packets source at 172.16.2.63 (workernode2) destined for 172.16.1.90 (workernode1) traverse our Cisco Spine and Leaf.
Future posts:
- Set type-5 gateway + multipath testing
- Advertise ServiceIP and PodCIDR (Cluster Mesh)
